

If you've ever needed to service, replace, or upgrade your SS316 dry deck underwater LED light with a grating, you know it's not just a quick DIY project-especially when working with a stainless steel fixture built to withstand harsh underwater and marine environments. As a supplier of these durable, high-performance lights, I've helped hundreds of boat owners, marina technicians, and fountain maintenance teams tackle this exact task, and I'm here to walk you through the process step by step, share the lessons I've learned over the years, and make the job go as smoothly as possible.
First, let's get one thing straight: SS316 dry deck underwater LED lights with gratings are designed to be low-maintenance and long-lasting, but that doesn't mean they never need attention. Whether your light's flickering, the grating is clogged with debris (a common issue for deck-mounted fixtures exposed to leaves, sediment, or marine growth), or you're upgrading to a newer model like our 316 Stainless Steel LED Fountain Lamp, removing them safely and correctly is key to avoiding damage to your deck, the fixture itself, or your wiring.
Before we dive into the actual removal, let's cover the prep work. This is non-negotiable, and I can't stress enough how skipping these steps leads to headaches later. First, always turn off the power at the circuit breaker or marine battery disconnect. Underwater lights run on low-voltage power usually, but even 12V can cause a shock if you're working with wet hands, and cutting power prevents any accidental short circuits that could damage the light or your electrical system. Next, gather your tools: a flathead screwdriver, a Phillips head screwdriver (most grating and fixture screws are stainless steel, so they're Phillips), a pry bar or small putty knife, a bucket for any small parts, and a mild degreaser if there's marine growth or debris around the fixture base.
Pro tip from someone who's seen too many rusted screws: If your fixture has been in place for a few years, the SS316 screws might be seized a little from saltwater or mineral buildup. Spray a small amount of penetrating oil on the screw heads 15 minutes before you start; this will make them much easier to turn without stripping. I always tell customers to use a good-quality stainless steel-specific penetrating oil-regular WD-40 might work temporarily, but it can leave residue that's hard to clean later.
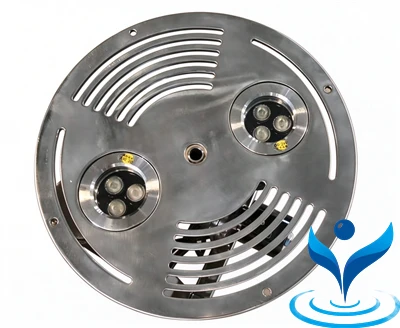
Now, on to the removal steps, which start with taking off the grating. The grating is that durable, grid-like cover that sits on top of the light, designed to keep debris out while letting light shine through. Most gratings are held in place by 4 to 6 small stainless steel screws, evenly spaced around the edge of the fixture. Locate these screws, and use your Phillips screwdriver to loosen them-don't remove them all yet. Once each screw is loose, gently lift the grating at one edge, then pull it off. If the grating is stuck, don't pry too hard; work the putty knife along the edge between the grating and the deck to break any seal from marine growth or caulk. Set the grating aside carefully-stainless steel is tough, but it can scratch if you drag it on concrete or the deck.
Next, once the grating is off, you'll see the main fixture body, which is mounted into a cutout in your dry deck. Underneath, there will be larger mounting screws, usually 2 or 4, that secure the light to the deck structure. These are also stainless steel, so same rule applies: loosen them, don't yank them out yet. Before you go any further, you'll need to disconnect the wiring. This is the part that causes the most mistakes, especially for beginners. Underwater lights have waterproof connections, usually either a waterproof nut and seal or a plug-and-play connector. Gently twist the connector apart (don't pull on the wires themselves-you can damage the internal connections) and set the wires to the side, taking care not to let them drop back into the deck or get tangled.


Wait a second-what if the grating is integrated into the fixture, not a separate part? Some of our newer models, like the 18W LED DMX Dry Fountain Light Floor Fountain Light land Fountain Light 6PCS Drains LED Land Fountain Light 3 Sizes Fully SS LED Lighting Underground, have the grating molded as part of the fixture base, so the step above changes a little. For integrated grating fixtures, you'll loosen the mounting screws first, then carefully lift the fixture just enough to access the wiring connector before removing it entirely. The same prep (power off, penetrating oil if needed) still applies, just adjust your order of operations to avoid damaging the integrated grating.
Once the wiring is disconnected and all mounting screws are out, gently pull the SS316 dry deck underwater LED light straight up. Sometimes, over time, the base of the fixture has a thick layer of marine caulk or sealant around the edge that's bonded it to the deck. If it doesn't lift easily, don't force it-insert the putty knife along the edge of the fixture base and gently twist to break the seal. Work around the entire perimeter until the fixture lifts free. Be careful here not to scratch the edge of your deck or the stainless steel fixture; the surface finish on these lights is part of their corrosion resistance, so any deep scratches can leave a spot where saltwater can seep in over time.
Now that the old light is out, you've got a few options. If you're replacing it with the same model, or a newer one from our range like Middle Hole Type Underwater LED Fountain Lights 5W RGB Middle Hole IP68 Light Donat LED Underwater Light Warm White Color LED Aluminium LED Underwater Light 110mm Diameter, make sure the cutout in your deck is the right size. Our lights come in different diameters-for example, the 195mm Diameter RGB LED Fountain Light of 3 Sizes Middle Hole 12V 4.5W 6W 8W is perfect for larger deck cutouts, while the smaller 5W model works for standard applications. Before installing the new light, take a minute to clean the cutout area: remove any old caulk, debris, or marine growth, and wipe it down with a mild detergent to make sure the new sealant adheres properly. If you're upgrading from an aluminum fixture, our Aluminum LED Middle Hole IP68 Light is a great choice for lighter applications, but for dry deck areas exposed to heavy salt spray, SS316 is still the gold standard for long-term durability.
I've heard a lot of customers say they want to skip removing the old light entirely and just install a new one on top-don't do that. Installing a new light over an old one leads to uneven spacing, poor sealing, and a higher risk of water getting trapped between the two fixtures, which can cause mold, rust, or electrical issues down the line. Taking the old light out properly gives you a clean, level surface for the new fixture, which is how you get years of trouble-free performance.
A few common mistakes I see people make when removing these lights: First, not turning off the power. Even low-voltage systems can arc if the connector is wet, and that can fry the new light's driver or cause a small shock. Second, stripping the screw heads. Using the right size Phillips screwdriver is key here-if the screw is worn down, use a screw extractor, or apply a little more penetrating oil and let it sit longer before trying again. Third, forcing the light out too hard, which can crack your deck or damage the fixture's water seal. The SS316 housing is tough, but the internal electronics are delicate, and the rubber seal that makes it IP68-rated can tear if you're rough with it during removal.
If you're not comfortable doing this yourself, that's totally fine. Most marina maintenance teams have the tools and experience to remove and replace these lights in 30 minutes or less. The most important thing is to use genuine replacement parts that match your existing SS316 dry deck fixture-generic lights might not fit the cutout, or their seals might not be compatible with underwater environments, leading to premature failure.
When you're ready to upgrade or replace your underwater LED light, whether you need a small 5W model for a small dry deck area or a powerful 18W DMX-controlled light for a larger fountain or boat deck, we've got a range of options to fit your needs. We design all our lights to be easy to install and remove, with SS316 housings built to handle 24/7 exposure to saltwater, UV rays, and rough conditions. If you have questions about which light is right for your deck, or need more guidance on the removal process, don't hesitate to reach out to our team to discuss your requirements.
At the end of the day, removing an SS316 dry deck underwater LED light with a grating isn't complicated-it just takes a little patience, the right tools, and a careful approach. Taking the time to do it correctly will save you from expensive repairs down the line and ensure your lights shine bright for years to come. Whether you're a seasoned boater or a first-time fountain owner, following these steps will make the process straightforward and stress-free.
References
- Marine Electrical Systems Maintenance: Best Practices for Underwater Fixtures. National Marine Manufacturers Association, 2022.
- SS316 Stainless Steel Corrosion Resistance in Marine Environments. Nickel Institute Technical Report, 2021.
- IP Rating Standards for Submersible Lighting. International Electrotechnical Commission (IEC 60529), 2020.
- Fountain and Deck Lighting Installation and Maintenance Guidelines. International Lighting Association, 2023.